agilex® 5 fpgas and socs
488 Topics
Why do I unexpectedly observe intermittent DDM Errors?
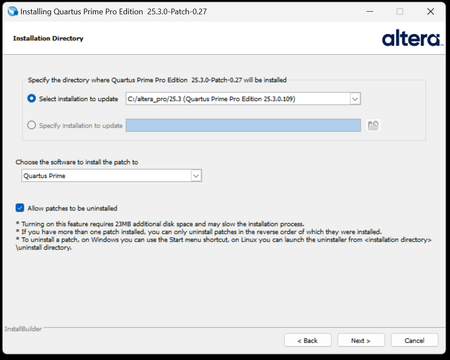
Description Beginning January 10, 2026, executing commands in the terminal or GUI of Quartus® Prime Pro Edition software, Quartus Embedded Edition software or select standalone tools may cause the software or tool to crash with an error similar to the crash signature shown below. This error affects: Quartus Prime Pro Software versions v23.3 through v25.3.1 Standalone Quartus Prime Pro Programmer v23.3 through v25.3.1 Standalone Quartus Prime Pro Embedded Edition v25.3 and v25.3.1 Standalone Quartus Prime Pro Power Thermal Analyzer v25.3 through v25.3.1 This issue is not observed in Quartus Prime Pro Edition versions 23.2 or prior or Quartus Prime Standard Edition. Crash Signature: Error (22912): Unhandled exception: Fatal Error: Assertion failed tools/cpp/ddm/ddm_assessor.cpp:53: DDM_T::verify_token(token) : Cannot identify the client from function assertion_error in tools/cpp/ddm_report/ddm_report_msg.cpp@465 *** Fatal Error: Program termination requested *** *** Below is the stack trace at the time the error occurred. *** The lines beginning "Err Handler" represent frames relating *** to generating this report. *** The point at which the error occurred is somewhere after these lines. *** There may be a few frames representing standard/library code *** before the Quartus frames begin. *** The search for the error should begin with the Quartus frames. *** Unwinder: libunwind *** Stack depth: 15 Quartus 0x24e67: err_terminator() + 0x1bc (ccl_err) Quartus 0xb036a: __cxxabiv1::__terminate(void (*)()) + 0xa (stdc++) Quartus 0xb03d5: (stdc++) Quartus 0xb0628: (stdc++) Quartus 0x1680d: void ddm_throw<DDM_RUNTIME_ERROR>(std::__cxx11::basic_string<char, std::char_traits<char>, std::allocator<char> > const&) + 0x26d (ddm_report) Quartus 0x13fae: DDM_REPORT::DDM_ASSERTION_HANDLER::assertion_error(std::__cxx11::basic_string<char, std::char_traits<char>, std::allocator<char> >) const + 0xde (ddm_report) Quartus 0x12a52: DDM_REPORT::ASSERTION_HANDLER::error(std::__cxx11::basic_string<char, std::char_traits<char>, std::allocator<char> >) + 0x72 (ddm_report) Quartus 0x13e64: DDM_REPORT::detail::assert_at_line(char const*, char const*, int, char const*, ...) + 0x1b4 (ddm_report) Quartus 0x205fb0: ddm_set_lassessor(DDM_T_ASSESSOR*, std::__cxx11::basic_string<char, std::char_traits<char>, std::allocator<char> > const&) + 0x60 (ddm) Quartus 0xf4445: DMS_MANAGER::DMS_MANAGER() + 0x5c5 (dni_dms) Quartus 0xf45b2: DMS_MANAGER::get() + 0x7a (dni_dms) Quartus 0xf6db4: _GLOBAL__sub_I_dms_manager.cpp + 0x58 (dni_dms) Quartus 0x647e: (ld-linux-x86-64) Quartus 0x6568: (ld-linux-x86-64) Quartus 0x202ca: (ld-linux-x86-64) Resolution To work around this problem: For Windows machines Download and unzip the Quartus Prime Pro version zip file that matches your Quartus Prime Pro version from this KDB. Double click on the executable ending in “windows.exe”. When the GUI pops up, press Next. Note that the GUI may look slightly different depending on the version of Quartus you are using. Accept the license agreement Specify the directory where the patch needs to be applied which may be a different location than Quartus install if you have standalone tools in a different directory from your Quartus Prime Pro software installation. Keep “Allow Patch to be uninstalled” selected. Select the software in which to install the patch: The patch will install in the directory of the software or tool you have selected. You will see an uninstall directory for the patch in your software or tool folder where patch is installed; it will contain an executable to uninstall the patch if required for any reason. To confirm patch is installed, you can run quartus_sh -v or corresponding version command for your tool via command line. Alternatively, you can Open Quartus in the GUI and select Help → About Quartus Prime in the main menu. If you are opening up a standalone tool you will navigate to Help-> About <tool_name>. For the Command Line Implementation of the patch in Windows, use the following command: <patch_filename.exe> --mode unattended --installdir <your_install_directory> --accept_eula 1 --patch_to [quartus|qprogrammer|qemb|pta] # An example to patch Quartus Prime Pro Edition Software v25.3: quartus-25.3-0.27-windows.exe --mode unattended --installdir /tmp/altera_pro/25.3 --accept_eula 1 # An example to patch the Standalone Programmer for Quartus Prime Pro Software v25.3: quartus-25.3-0.27-windows.exe --mode unattended --installdir /tmp/altera_pro/25.3 --accept_eula 1 --patch_to qprogrammer For Linux machines: Download and unzip the Quartus Prime Pro version zip file that matches your Quartus Prime Pro version from this KDB. Ensure you run chmod +x on the file ending with linux.run. Run in the command line: ./<installation_patch_run_file>. When GUI pops up, press Next. Note that the GUI may look slightly different depending on the version of Quartus you are using. Accept the license agreement Specify the directory where the patch needs to be applied which may be a different location than Quartus install if you have standalone tools in a different directory from your Quartus Prime Pro software installation. Keep “Allow Patch to be uninstalled” selected. Select the software in which to install the patch: The patch will install in the directory of the software or tool you have selected. You will see an uninstall directory for the patch in your software or tool folder where patch installed; it will contain an executable to uninstall the patch if required for any reason. To confirm patch is installed, you can run ./quartus_sh -v or corresponding version command for your tool via command line. Alternatively, you can Open Quartus in the GUI and select Help → About Quartus Prime in the main menu. If you are opening up a standalone tool you will navigate to Help-> About <tool_name>. For the Command Line Implementation of the patch in Linux, use the following command: ./<patch_filename.run> --mode unattended --installdir <your_install_directory> --accept_eula 1 --patch_to [quartus|qprogrammer|qemb|pta] # An example to patch Quartus Prime Pro Edition v25.3: ./quartus-25.3-0.27-linux.run --mode unattended --installdir /tmp/altera_pro/25.3 --accept_eula 1 # An example to patch the Standalone Programmer for Quartus Prime Pro Software v25.3: ./quartus-25.3-0.27-linux.run --mode unattended --installdir /tmp/altera_pro/25.3 --accept_eula 1 --patch_to qprogrammer This problem has been fixed in Quartus® Prime Pro Edition Software version 26.1. The below table lists the patches that are available and the associated patch number. The patch zip files are attached to the KDB below: Quartus Prime Pro Edition Version Patch Number 23.3 0.52 23.4 0.70 23.4.1 1.01 24.1 0.52 24.2 0.64 24.3 0.35 24.3.1 1.29 25.1 0.36 25.1.1 1.31 25.3 0.27 25.3.1 1.0212KViews5likes0CommentsWhy does my Quartus® Prime Installation fail with certificate error: SSL certificate problem: unable to get local issuer certificate (curlcode 60)?
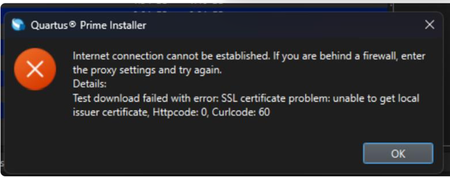
Description Due to a problem in the Quartus® Prime Installer Software, you might see the error message shown below when you click Download & Install. This happens because the certificate bundled with the Quartus® Prime Installer Software is no longer accepted by the Altera® Content Delivery Network (CDN). As a result, secure downloads initiated during the installation process cannot be verified using the outdated certificate. The issue impacts the Installer for the following versions of Quartus software: Operating System Quartus Prime Pro Installer Version(s) Quartus Std/Lite Installer Version(s) Microsoft Windows* 23.3 to 25.3.1 23.1std to 25.1std Linux* 23.3 to 23.4 23.1std The KDB workaround provided below applies to the following versions of Quartus software: Quartus Prime Pro Installer Version(s) Quartus Std/Lite Installer Version(s) KDB workaround applies to 24.3 to 25.3.1 24.1std to 25.1std Note that for all other affected versions not covered by the KDB, you cannot use the installer workaround and must download Quartus software package files individually without using the installer. Separate packages can be found in the Individual Files tab of the Quartus Software Download pages. Resolution To work around this problem, follow these steps: 1. Download and unzip the cacert.zip, which contains the cacert.pem certificate file. 2. Specify the new certificate using one of the following methods: i) Command Line Interface (CLI): Open a command prompt or terminal and run the installer with the--cacert option, pointing to the new certificate file. Windows*: qinst_<version>.exe -sp"--cacert <full path to cacert.pem>" Linux*: qinst_<version>.run -- --cacert <full path to cacert.pem> ii) Graphical User Interface (GUI): - Open the Quartus® Prime Installer, navigate to Settings, locate the CA Certificate Path, and specify the full path to the cacert.pem certificate file. - Then, click Apply > OK. This problem is scheduled to be resolved in a future release of the Quartus® Prime Installer Software.11KViews1like0Comments
Can I assign a pull-down or pull-up resistor to an Agilex™ 5 FPGA HPS IO?
Description Yes, Agilex™ 5 FPGA HPS IOs allow to selection of one of the following options: No Pull-down nor pull-up resistor 20K pull-up resistor 50K pull-up resistor 80K pull-up resistor 20K pull-down resistor 50K pull-down resistor 80K pull-down resistor The default value is a 20K pull-up resistor. However, due to a Quartus® Prime Software Suite bug, this setting might not be reflected in the Compilation Report. Resolution The suggested method for assigning a pull-up or pull-down resistor to an Agilex™ 5 FPGA HPS IO is using the Assignment Editor and selecting Weak Pull-Up/Down Select as the Assignment Name. On the other hand, the above-described Quartus® Prime Software Suite bug will be fixed in a future release.1.1KViews0likes0CommentsWhy don’t I get a programming file when I compile with the Quartus® Prime Pro Edition software version 25.1.1?
Description Beginning with version 25.1.1 of the Quartus® Prime Pro Edition software, pin location assignments and I/O standard assignments are required for a programming file to be generated. If these required assignments are missing, no programming file is generated. You must add the required assignments and recompile your design to generate a programming file. If you do not want to generate a programming file, you may ignore this behavior change. To determine whether your design is missing pin location or I/O standard assignments, review your compilation messages. If either of the following messages was generated during your compile, your design is missing pin location or I/O standard assignments that are required to generate a programming file: Critical Warning: Some pins have incomplete I/O assignments. Refer to the I/O Assignment Warnings report for details Critical Warning: No exact pin location assignment(s) for <number> pins of <number> total pins. For the list of pins, please refer to the I/O Assignment Warnings table in the fitter report Resolution Review the I/O Assignment Warnings report, found in the Place sub-section of the Fitter section of the compilation report. Alternately, review the <revision>.fit.plan.rpt report file. For any pins in the I/O Assignment Warnings report that are reported as “Missing location assignment” or “Missing I/O standard,” add the appropriate location or I/O standard assignment. For help making these assignments, refer to Assigning I/O Pins After adding any required assignments, recompile the design to generate a programming file. This change applies to all device families supported by the Quartus® Prime Pro Edition software, beginning in version 25.1.1. Missing pin location or I/O standard assignments are reported as a critical warning, not an error. If you script the compilation of projects, the exit code of the compilation process still indicates success even if pin location or I/O standard assignments are missing, because missing pin location or I/O assignments are reported as a critical warning, not an error.600Views0likes0CommentsWhy Can't I Program Using Active Serial Programming with my USB Blaster III?
Description Due to a firmware issue the USB Blaster III Development cable may not have the correct product ID and may inadvertently disabled the active serial programming feature. Is my Development Cable affected by this? If your USB Blaster III Development cable has a serial number ranging from UB3000000 - UB3006090, then you will need to update the PID. Resolution To resolve this issue the Product ID of the cable should be updated to (6023). Perform the following steps on Windows to update the ID. Download and Install the FT_PROG.exe the EEPROM Programming Utility from FTDI https://ftdichip.com/utilities/ Plug-in your USB Blaster III development cable into your computer. Uninstall the USB Blaster III device driver from the device manager. Open the Windows Device Manager. Find the group called JTAG cables, under this group there should be a USB Blaster III device. Right Click on the USB Blaster III device and Click Uninstall. Tick "Attempt to delete the driver for this device" or "Delete the driver software for this device" during uninstallation. This prevents the UB3 driver from being automatically reinstalled. Install the FTDI Device driver. Open the Windows Device Manager. Find the group called Other Devices. In the group Other Devices there may be several USB Blaster III devices. To Identify the correct USB Blaster III device Right click on each USB Blaster III device and click Properties. Find USB Blaster III device that contains values that end with MI_00 Once Identified, Right click on correct USB Blaster III device and click Update driver To Update driver click Browse my computer for drivers Search and select the USB Blaster III driver directory under your Quartus installation. <Quartus Path>\qdrivers\quartus\drivers\usb-blaster-iii Click Let me pick from a list of available drivers on my computer. If, Select your device’s type from the list below, choose Universal Serial Bus controllers. When selecting a driver click the FTDI manufacturer then select USB Serial Converter A Version: 2.12.36.4 and click the Next button. Program your USB Blaster III Development Cable with FT_PROG.exe to update your product ID. Open the FT_PROG.exe from FTDI installed in step 1. From the DEVICES menu click Scan and Parse to bring up your USB Blaster III Device Under the Device Tree select the section called USB Device Descriptor This should contain a property called Product ID and should have a value of 6023, change this to 6023 if it is not set to this value. Once changed, under the DEVICES menu click Program to flash the EEPROM Uninstall the FTDI driver installed in step 4. Open the Windows Device Manager. Find the group Universal Serial Sub controllers In the Universal Serial Bus controllers right click on the USB Serial Converter A and Click Uninstall. Do not tick "Attempt to delete the driver for this device" or "Delete the driver software for this device". Re-Install the USB Blaster III device driver. Open the Windows Device Manager. Find the group called Other Devices. In the group Other Devices there may be several USB Serial Port devices or USB Blaster III devices. To Identify the correct USB Serial Port device Right click on each USB Serial Port device and click Properties. Find USB Serial Port device that contains values that end with MI_00 Once Identified, Right click on correct USB Blaster III device and click Update driver To Update driver click Browse my computer for drivers Search and select the USB Blaster III driver directory under your Quartus installation. <Quartus Path>\qdrivers\quartus\drivers\usb-blaster-iii Click the Next button. Windows should show USB Blaster III driver installed. Verify USB Blaster III device has the correct Product ID. Open the Windows Device Manager. Find the group called JTAG cables, under this group there should be a USB Blaster III device. Right click on each USB Blaster III device and click Properties. Values should contain PID_6023 in the string, if not unplug and re-plugin the device. Open Quartus Programmer and Validate that the Active Serial programing is now available.402Views0likes0CommentsWhy does the Linux shows "Cannot enable. Maybe the USB cable is bad?" error message when a USB 3.1 thumb-drive is plugged-in?
Description In Quartus® Prime software of version 25.3 and older, you may see the error message “Cannot enable. Maybe the USB cable is bad?” when a USB 3.1 thumb-drive is plugged-in. This is due to an incorrect Phase Locked-Loop Bandwidth configuration in PMA direct mode for USB, which caused the instability in USB 3.1 link layer when reaching the U0 state. This issue has been fixed in the newer Quartus® software releases. Resolution To solve this issue, upgrade your Quartus® software to Quartus® Prime Pro 25.3.1 version or newer versions.400Views0likes0CommentsWhy does the Nios® V processor that applies fast JTAG UART driver stop (stuck in a loop) when the JTAG UART terminal is not active?
Description Due to a problem in the Board Support Package Editor of Quartus ® Prime software, the JTAG UART driver for fast implementation might get stuck in a loop for any Nios ® V processor designs, when JTAG UART terminal is not active. This problem has been present since: Quartus ® Prime Pro Edition software version 21.3 Quartus ® Prime Standard Edition software version 22.1 It is because the JTAG UART IP is initialized before the Nios ® V processor initialization in alt_sys_init.c. For example: void alt_sys_init( void ) { ALTERA_AVALON_JTAG_UART_INIT (JTAG_UART, jtag_uart); INTEL_NIOSV_M_INIT (NIOS, nios); } Resolution To work around this problem, update the alt_sys_init.c to initialize the Nios ® V processor first. void alt_sys_init( void ) { INTEL_NIOSV_M_INIT (NIOS, nios); ALTERA_AVALON_JTAG_UART_INIT (JTAG_UART, jtag_uart); } This problem is currently scheduled to be resolved in a future release of the Quartus ® Prime software. Additional Information Refer to Embedded Peripherals IP User Guide [titled as JTAG UART Core - Driver Options: Fast vs. Small Implementations] for more information about the JTAG UART driver for fast (non-blocking) and slow (blocking) implementation. Related Article NIOSV firmware stuck when juart-terminal is not open for the print messages.400Views0likes0CommentsWhy does the Synopsys VCS* simulator produce incorrect simulation results for Agilex® 5 FPGAs?
Description The Agilex™ 5 FPGAs do not support the Synopsys VCS* two-step flow (compile and elaborate in one step and simulate in the next). You might see incorrect simulation results when simulating a multi-IP design with Synopsys VCS* simulator if you specify all IP and Quartus® simulation library source files using a single VCS command line, run_vcs. Resolution Follow these steps to use Synopsys VCS* simulator with VCS MX flow: Create design libraries using the mkdir command Compile all IP and Quartus® simulation library source files into their respective libraries using vlogan or vhdlan commands Elaborate the top-level design using the vcs command without specifying the source files compiled in Step 2 Simulate your design using the generated simv executable file The above steps are sometimes called VCS or VCS MX three-step flow (compile in one step, elaborate in the next step, and simulate in the final step). For information on which library files to be compiled, command examples, and command arguments, refer to the Platform Designer-generated VCS MX simulation setup script (/synopsis/vcsmx/vcsmx_setup. sh). If you were previously using the Platform Designer-generated VCS simulation setup script (/synopsys/vcs/vcs_setup.sh), switch to using the Platform Designer-generated VCS MX simulation setup script (/synopsys/vcsmx/vcsmx_setup.sh). Refer to Quartus® Prime Pro Edition User Guide: Third-party Simulation for more guidelines on incorporating the generated Synopsys VCS MX simulation scripts into a top-level project simulation setup script. Agilex® 5 FPGA no longer supports the VCS 2-step flow; only the VCS 3-step flow is supported.400Views0likes0CommentsWhat is the latest device firmware for the Agilex® FPGA and Stratix®10 FPGAs?
Description Altera® recommends using the latest version of the Quartus® Prime Pro Edition Software and the latest available device firmware. Please also see the following user guides: Updating the SDM Firmware in the Agilex® 7 FPGA Configuration User Guide Updating the SDM Firmware in the Stratix® 10 FPGA Configuration User Guide Resolution The latest device firmware available for the Quartus® Prime Pro Edition Software can be downloaded from the following links: Quartus Prime Pro Edition Software version 25.3 What is the latest device firmware for the Quartus® Prime Pro Edition Software version 25.3? Quartus Prime Pro Edition Software version 25.1 What is the latest device firmware for the Quartus® Prime Pro Edition Software version 25.1? Quartus Prime Pro Edition Software version 24.3.1 What is the latest device firmware for the Quartus® Prime Pro Edition Software version 24.3.1? Quartus Prime Pro Edition Software version 24.3 What is the latest device firmware for the Quartus® Prime Pro Edition Software version 24.3? Quartus Prime Pro Edition Software version 24.2 What is the latest device firmware for the Quartus® Prime Pro Edition Software version 24.2? Quartus Prime Pro Edition Software version 24.1 What is the latest device firmware for the Quartus® Prime Pro Edition Software version 24.1? Quartus Prime Pro Edition Software version 23.4 What is the latest device firmware available for the Quartus® Prime Pro Edition Software version 23.4? Quartus Prime Pro Edition Software version 23.3 What is the latest device firmware available for the Quartus® Prime Pro Edition Software version 23.3? Quartus Prime Pro Edition Software version 23.2 What is the latest device firmware available for the Quartus® Prime Pro Edition Software version 23.2? Quartus Prime Pro Edition Software version 23.1 What is the latest device firmware available for the Quartus® Prime Pro Edition Software version 23.1? Quartus Prime Pro Edition Software version 22.4 What is the latest device firmware available for the Quartus® Prime Pro Edition Software version 22.4? Quartus Prime Pro Edition Software version 22.3 What is the latest device firmware available for the Quartus® Prime Pro Edition Software version 22.3? Quartus Prime Pro Edition Software version 22.2 What is the latest device firmware available for the Quartus® Prime Pro Edition Software version 22.2? Quartus Prime Pro Edition Software version 22.1 What is the latest device firmware available for the Quartus® Prime Pro Edition Software version 22.1? Quartus Prime Pro Edition Software version 21.4 What is the latest device firmware available for the Quartus® Prime Pro Edition Software version 21.4? Quartus Prime Pro Edition Software version 21.3 What is the latest device firmware available for the Quartus® Prime Pro Edition Software version 21.3? Quartus Prime Pro Edition Software version 21.2 What is the latest device firmware available for the Quartus® Prime Pro Edition Software version 21.2? Quartus Prime Pro Edition Software version 21.1 What is the latest device firmware available for the Quartus® Prime Pro Edition Software version 21.1? Quartus Prime Pro Edition Software version 20.3 What is the latest device firmware available for the Quartus® Prime Pro Edition Software version 20.3?399Views0likes0CommentsWhen does the Quartus® Prime Design Software, IP cores, and Questa*-Altera® FPGA Edition Software check out a license?
Description Below is a description of how the Quartus® Prime Design Software, IP cores, and Questa*-Altera® FPGA Edition Software utilize licenses: Resolution Quartus® Prime Design Software: All Quartus® Prime Design Software processes check for a valid license, including the Quartus® GUI, Analysis & Synthesis, Assembler, and TimeQuest Timing Analyzer. These processes start only if a valid license is available. They do not hold or occupy the license; they only validate that one is available. However, the Fitter checks out a license when it starts and holds it for the duration of the Fitter process. IP cores: A license for an IP core is checked out when the Quartus® Prime Design Software opens the first encrypted file of the IP core for synthesis. This license is held for the duration of synthesis. The Assembler checks out the license for every IP core to create the programming file and holds it for the duration of the Assembler process. Questa*-Intel® FPGA Edition software: Once Questa*-Intel® FPGA Edition Software loads a design unit during elaboration, a Questa-Intel® FPGA Edition license is checked out. It remains checked out until the simulation ends (quit -sim), or the simulator is closed. Once a waveform is loaded into the simulator, a Questa*-Intel® FPGA Edition Software license is also checked out for viewing Wave Log Format File (.wlf), and it remains checked out until the waveform window is closed. Related Articles What happens to a license if the Quartus II software terminates unexpectedly? Can I perform multiple compilations using the Quartus II software at the same time on one computer with a one seat floating license or one fixed (node locked) license file?399Views0likes0Comments